In the fast-paced world of e-commerce, the image is the primary and most influential language of communication between merchant and customer. When customers browse your online store, they lack the sensory experience traditional stores provide — they can't touch the fabric of clothing, smell the fragrance of perfume, or examine the quality of the materials the product is made of. Here professional product photography comes in as the bridge compensating for this lack, where the image transforms from mere documentation of the product's shape into a powerful persuasion tool conveying the finest details and arousing the desire to buy. In the Saudi and Arab markets, with increasing competition, relying on random or low-quality images is no longer an option for those seeking success.
For merchants operating on Salla and Zid, product photography represents one of the most important pillars of building a digital brand. The platforms provide excellent technical infrastructure and smooth user experience, but the visual content you place inside these templates is what determines whether visitors will convert into buyers or leave the store without return. Attractive and thoughtful images reflect your professionalism and attention to detail, planting trust in the consumer's mind and making them feel they're dealing with a trustworthy commercial entity worthy of their money.
In this comprehensive guide, we'll take you on a detailed and practical journey to master product photography specifically for your Salla and Zid stores. We'll explore together the essential equipment, how to set up a home photography studio at an economical cost, plus the golden rules for capturing images that captivate the eye and push customers to complete the order. Whether you sell beauty products, clothes, or electronics, the principles we'll review here will form a real turning point in your store's performance and sales, enabling you to compete strongly in a market that doesn't forgive the visually weak.
Why Is Product Photography the Most Important Investment for Your Store?
Investing in product photography isn't just an aesthetic improvement to your store's interface — it's an integrated marketing strategy directly affecting your profits. First and foremost, high-quality images build a strong wall of trust between you and the customer. When shoppers see a clear image highlighting product details from multiple angles, with correct lighting showing true colors, they feel reassured. This reassurance reduces hesitation preceding payment, immediately and positively reflecting on your numbers — directly affecting your store's Conversion Rate, converting passing visitors into permanent customers.
The second and most operationally important reason is reducing return rates. In the world of e-commerce, returns are considered a nightmare haunting merchants, causing them losses in shipping, packaging, and time costs. The vast majority of product return reasons go back to "the product doesn't match the image." When you invest in accurate photography showing the actual product size, true color, and material texture as much as possible, you set customer expectations correctly. A customer who receives a product matching exactly what they saw on screen is a happy customer who won't think of returning — they may even leave a positive review enhancing your store's reputation.
Third, photographing products in a unified style contributes to establishing your brand's visual identity. Imagine entering a Salla store finding images with pure white backgrounds and bright lighting, then moving to another Zid store finding images relying on dark wooden backgrounds and warm lighting. Each photography style sends a different psychological message and targets a specific segment. Sticking to one professional visual style across all your product images makes your store look like a major brand, easy for customers to remember and recognize your products even if they see them in social media ads without seeing your store logo.
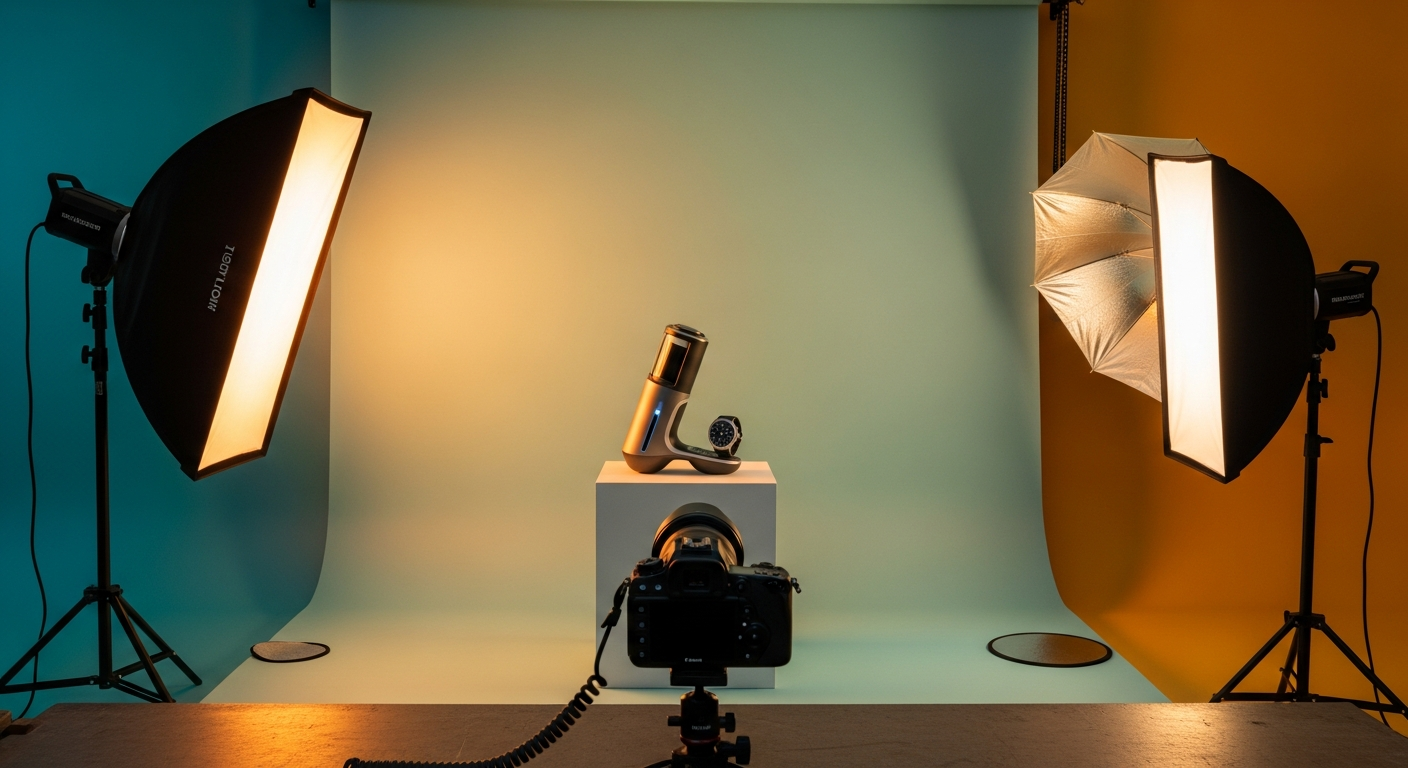
Essential Equipment to Start Professional Product Photography
The first step in the photography journey is to dispel the myth that you need professional cameras costing thousands of dollars to start. In reality, modern smartphones have lenses and sensors capable of capturing stunning images meeting all needs of Salla and Zid stores. Phones like the latest iPhone or Samsung Galaxy devices come equipped with advanced photography modes like "Macro" for very close shots and "Portrait" mode to isolate the background. More important than the camera type is your understanding of how to use it — cleaning the lens well before shooting and using manual Focus feature to ensure image sharpness and product detail clarity.
The second and most decisive element in image quality is lighting. Lighting is the soul that breathes life into the product image, and without it even the most expensive cameras will produce dull, eye-irritating images. You can start using natural light, which is completely free and excellent for beginners, by shooting next to a large window allowing indirect sunlight in. If you want more control, you can invest in simple artificial lighting equipment like a Softbox or Ring Light, which guarantee even and continuous lighting at any time of day, saving you the trouble of waiting for the right time to shoot.
The third element is the tripod and suitable backgrounds. A tripod isn't a luxury tool — it's an extreme necessity for two reasons: First, it prevents camera or phone shaking, guaranteeing very sharp images free from any blur. Second, it ensures a fixed shooting angle for all products, giving the product grid in your store a coordinated and professional look. For backgrounds, it's always preferable to start with a pure White Sweep using non-glossy cardstock, as this background helps highlight true product colors and greatly facilitates image editing later, including background removal if needed.
Setting Up a Home Photography Studio at an Economical Cost
Setting up a dedicated photography space doesn't require renting a huge studio or paying huge amounts — you can prepare an effective home studio at the lowest costs. Start by choosing the most suitable room in your home or office, preferably a room containing a large window facing north or south to avoid sharp direct sunlight that creates strong shadows. Place a sturdy table near this window so light falls on the product from the side or at a 45-degree angle. This position highlights the texture and fine details of the product professionally and attractively.
If your products are small in size like jewelry, perfumes, or cosmetics, you can make a Lightbox yourself using a regular cardboard box. Cut the sides of the box and cover them with transparent paper or light white fabric (like wax paper or tulle), then place regular desk lamps outside to cast light through this paper. The paper will work as a "Light Diffuser," producing very soft lighting free of harsh shadows — the ideal lighting you see in global store images that gives a sense of luxury and purity.
To ensure efficiency and speed of work, install small marks on the floor using adhesive tape to designate where the tripod stands, and other marks on the table to designate the product placement. This simple organization will save you long hours of adjusting settings every time you decide to add a new product to your Salla or Zid store. Once you adopt the lighting settings and camera angle, the process of photographing new products becomes routine and fast, ensuring all store images are perfectly consistent and speak in one visual language comforting the shopper's eye.
Rules and Secrets for Capturing Images That Sell Your Products Effectively
To convert an image from a regular shot into a powerful sales tool, you must adopt a multi-angle strategy. Don't settle for one image of the product from the front — customers need an experience close to reality. Capture an attractive and clear main frontal image to use as the basic display image in the store, then add images from the sides, the back, and close (Macro) images highlighting stitching quality, engraving precision, or material types used. This diversity answers the customer's silent questions and removes any doubts they have about the quality of the product they intend to pay their money to get.
The second secret to increasing sales is using "lifestyle photography." While white-background images are excellent for clearly showing product details, lifestyle images are the ones that sell the "dream" and create emotional connection. If you sell a coffee cup, photograph it filled with hot coffee on a wooden table next to an open book and reading glasses. If you sell a bag, photograph it carried by a person in a sunny street. These images help customers imagine themselves owning and using the product. And naturally, while images grab customer attention, combining them with carefully written Product Descriptions is what successfully closes the sales deal.
The third rule relates to the editing and processing process. Capturing the image is only half the battle — the other half lies in improving it using editing programs. The golden rule here is: "Enhance the image, don't deceive the customer." Use apps like Lightroom or Snapseed to adjust White Balance so white appears pure and not tending to blue or yellow. Increase Contrast slightly to highlight details, and adjust brightness to ensure product clarity. Completely avoid using ready-made Filters that change true product colors, because this will inevitably lead to return complaints.
Common Product Photography Mistakes to Completely Avoid
Among the most fatal mistakes beginner store owners fall into is ignoring shadow management. Using strong, direct lighting like the camera's built-in flash or direct midday sunlight creates harsh black shadows behind the product and annoying glare on its surface hiding its features. This mistake gives an immediate impression of weak quality and lack of professionalism. The solution always lies in diffusing light using simple tools as mentioned earlier, and using Reflectors — which can simply be a white foam board — to reflect light on the dark side of the product and reduce shadow intensity.
The second mistake is using crowded or inappropriate backgrounds distracting buyer attention. The product must be the sole hero of the image. If you place the product amid many accessories and decorations unrelated to it, the consumer's eye will get lost and won't focus on what you're actually selling. This visual distraction creates a bad user experience and makes customers leave the page without making a decision. Often, poor image quality and attention distraction are among the hidden reasons behind exacerbating the Abandoned Carts problem, where customers lose their enthusiasm and desire to complete the purchase in the final moments.
The third trust-destroying mistake is color inaccuracy. Imagine a customer ordering lipstick based on an image showing it as "light pink," only to be surprised upon receipt that it's "dark red." This mistake happens due to not adjusting white balance in the camera, or due to room colors reflecting on the product (for example, photographing a white product in a room with yellow walls). To avoid this, make sure to shoot in an environment with neutral colors, and calibrate your phone or computer screen while editing images to ensure that what you see on screen exactly matches the real product color in front of your eyes.
Optimizing and Preparing Images for Salla and Zid
After finishing shooting and editing, comes the most important technical step which is preparing the images to suit the requirements of Salla and Zid platforms. The first thing to consider is the image dimensions and Aspect Ratio. Platforms usually prefer square images (1:1 ratio) at unified sizes like 1080×1080 pixels. It's very essential that all your store images be at the same size and the same surrounding space ratio around the product, as this unification is what makes the store interface look organized and professional when browsing products in the categories page, making it easy for the eye to navigate between options comfortably.
The second vital point is the image file size. Uploading images at 5 or 10 megabytes per image is a disastrous mistake that will significantly slow down your site loading. Internet users lack patience, and if your store takes more than 3 seconds to load, they'll leave immediately. You must compress images before uploading using free tools like TinyPNG or convert them to the modern WebP format which provides high quality with very small file size (preferably image size less than 200 kilobytes). Site speed is a decisive factor in user experience and directly affects sales.
Finally, don't miss the opportunity to optimize your images for search engines. Before uploading the image to Salla or Zid, change the file name from random numbers (like IMG_1234.jpg) to a name accurately describing the product in Arabic or English (like black-mens-athletic-shoes.jpg). Additionally, be sure to fill the "Alt Text" field when uploading the image to the platform, and write an accurate description of what the image contains using your keywords. This procedure is an integral part of Store SEO, helping Google search engine understand your image content and show them to potential customers in image search results, bringing you free and targeted visits.
Conclusion: Your Next Step Toward a Visually Stunning Store
In closing this detailed guide, we must emphasize that product photography in e-commerce isn't just a supplementary step — it is the essence of the digital shopping experience and your store's facade speaking on your behalf. Professional images are your sales representative working around the clock in your Salla or Zid store. They grab attention, explain features, remove doubts, and finally convince customers to put the product in cart and complete payment. Investing in this aspect, whether with time to learn skills or money to provide a suitable photography environment, is an investment with guaranteed return that quickly shows in your sales numbers.
We've reviewed together how the beginning doesn't require superhuman equipment — it depends on understanding lighting basics, fixing the camera, and organizing your own workspace even if it's a small corner in your home. We also touched on the importance of varying shots between clear white images and lifestyle images touching consumer emotions, and warned of fatal mistakes like annoying shadows and inaccurate colors that may destroy customer trust and increase returns. Finally, we clarified how to translate this artistic effort into technical success through optimizing image dimensions and sizes to suit e-commerce platforms and align with search engines.
Your next step now starts with practical application. Don't wait until you own a complete studio — start today. Open your current store, choose the best-selling product or the product you think is visually underserved, and apply these tips to capture new images of it. Use your smartphone, look for good window lighting, arrange a clean background, and capture several angles. Edit them gently, adjust their sizes, then upload them to the store and compare engagement and sales before and after the modification. You'll then realize that the magic of e-commerce truly lies in visual details, and that your next image may be the key to your great success.